Ensalada de Pulpo con tomates ahumados (Octopus Salad with smoked tomatoes)

0

70261144_10217767910602202_8963468529093312512_n

The variety of textures is pleasing on the tongue, and the variety of ingredients ensures that each bite will be slightly different from the one on either side. I think of this as a summer salad, but even though I’m making it in mid-September, summer is still in full swing in Los Angeles (save for the ever-shortening daylight hours).

INGREDIENTS

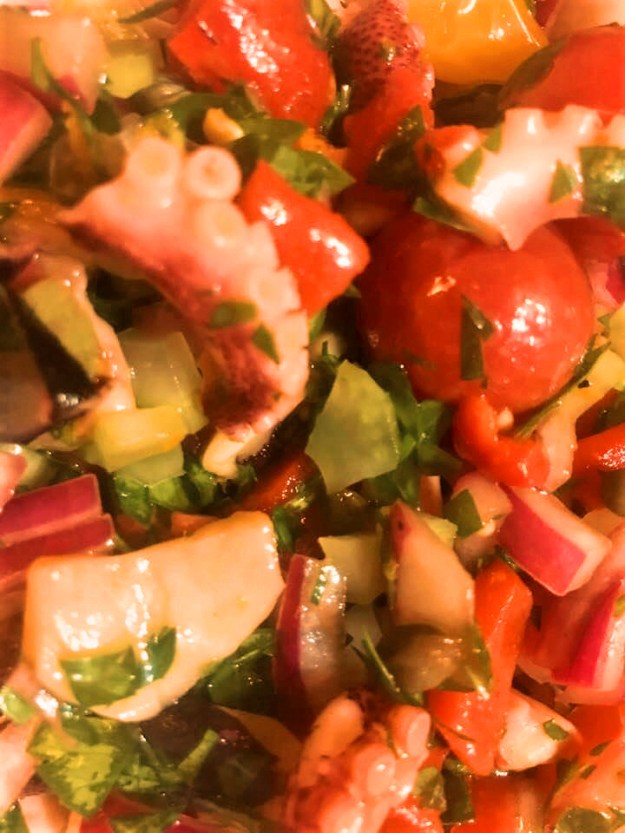
1.33 lbs / 600 g octopus, cooked and chopped
1 medium bunch fresh parsley, chopped (leaves only — well, mostly)
2 stalks celery, minced
1 orange, zested (zest only)
1 bottle (12 oz. / 340 g) marinated red peppers, diced
1/2 red onion, quartered, sliced thin, and macerated
2 tbsp / 20 g bottled capers, drained
2 dozen smoked and roasted cherry tomatoes, optional
vinaigrette dressing to taste
coarse or flaked sea salt to taste for finishing

DIRECTIONS

I bought my octopus already cooked, but if you don’t have a store that carries such, cooking octopus is pretty easy (cooking it well, however, is perhaps a little more difficult).

[I will be posting a technique for cleaning and cooking octopus in the Instant Pot® in the next week or 10 days. ]

Most of the work here is cleaning, chopping, and mixing. If you have a Microplane zester, it will make short work of the orange. You can substitute lime, lemon, or grapefruit zest if an orange isn’t handy, but I think orange suits it best.

Macerating the onion entails soaking it in red wine vinegar (or plain old white vinegar if you must) and a pinch of salt for about an hour. During that time, the purple/red of the onion will lighten considerably, and the onion itself will lose some (but not all) of its bite. After the hour is up, you can drain and rinse the onion before adding it to the salad. [You can dress the salad while the onion is macerating; it’s better when the dressing has had a little chance to mingle and be absorbed.]

As for the vinaigrette, I went super simple: 1 part red wine vinegar to 3 parts olive oil, and a teaspoon / 2.5 gm of ground black pepper. I didn’t want to get too fancy, because I didn’t want to overwhelm our cephalopod friend. That said, since there are so few ingredients in the dressing, I made sure to use a really good olive oil. If I’d had access to the appropriate Gegenbauer vinegar, I would have used that, but my remaining sour cherry vinegar wasn’t right for this recipe.

I happened to have roasted and smoked cherry tomatoes taking up space in the fridge, and they were a welcome addition, but by no means crucial. You could use regular cherry or grape tomatoes, or none at all.

Pop the whole lot in the chill chest and refrigerate for at least an hour before serving. This will make an opening salad for 6-8, but the bride and I made it our main course, and polished off about 2/3 of it. We’ll finish up the rest tomorrow because, well, seafood.

And as for summer, I’m gonna hang on to it until reality intrudes, and I have to trade my rosé for a single malt, and my light-filled salads for soup.


Summer Vegan Bean Salad I

0

Bless you, Steve Sando.

Summertime, and the livin’ is… damn sticky, for the nonce, in Southern California. And there’s another heat wave coming. The last thing I want to do is to, say, sit over a pot of saffron risotto for an hour. I’d like something cool, and refreshing, and clean, and if I were able to subsist on gin and tonic or Croma Vera Albariño, well, I’d probably do that. My doctor might suggest some other course; I bet she’d be just fine with this one.

The first trick to any bean salad is — duh — great beans. I’ve long extolled the virtues of Rancho Gordo’s heirloom beans, and that’s where I started. The bride and I are particularly fond of their Royal Corona beans, which are kin to the Gigandes plaki, often spelled as yigandes, used in the great Greek meze served under an expansive canopy of tomato sauce and often accompanied by Feta cheese and bread. Rancho Gordo founder Sando is something of a bean whisperer, and cultivates heirloom beans all over the world, working with local farmers at fair prices. He is a hero, full stop.

The second trick to a good bean salad is a balance of flavours and textures. No one wants a limp bean any more than they want a wet noodle — and I mean that literally and figuratively. When I knew I would be building off a base of Royal Corona beans, I compiled a culinary dance card of prospective partners, seen below. Since this is a really adaptable bean, I knew I could go off in several directions, but not all at once. So: I decided to make it Vegan. I knew sun-dried tomatoes and marinated red bell peppers would be part of it for colour and taste and texture. Then it was a matter of filling in gaps. Celery for crunch. Capers for salt and tang. Slivered almonds for more crunch. Macerated red onion for a little assertiveness, but not too much, hence the maceration. Scallions and parsley for herbaceousness and colour. Fresh thyme for extra aromatics. There were some herbs and oil in the sun-dried tomatoes, and I decided to use them rather than rinse them off, and finish off the salad dressing as needed.

NOT “5 Livered Almonds.” The pen was malfunctioning.

This is truly a salad that can be assembled by an elementary schooler, as soon as she can be trusted with a knife (and has the upper body strength to open vacuum-packed bottles, or can inveigle someone to do it for her).

Macerating the onion in this case consists of dicing it and dropping it in a bowl with enough water to cover it, dumping in a glug — that’s a technical term — of some sort of vinegar, and about .5 cup / 170 g of sugar, then stirring it up and setting it into the fridge for an hour or so, to blunt the onion’s sharpness. It’s not quite a quick pickle, but it does temper its aggressiveness.

As for the beans, I made them in my Instant Pot®. Rinsed them, covered them with water, and set the pressure on high for 25 minutes with a natural release. You can soak them overnight if you wish, and cook them in a trad soup pot (I do this in winter, just for the atmosphere), but I was shooting for fast results. I drained the cooked beans and rinsed them with cold tap water, then dumped them in with the already macerating onion to cool them down some more. Kilotonnes of options here, feel free to follow your path.

Give it a bit to mingle flavours, and you may or may not want to top it with a vinaigrette. As it turned out for me, just a few drops of great old Balsamic vinegar and a sprinkling of black sea salt flakes (the flakes were black due to charcoal; they weren’t from the Black Sea) finished it off nicely, even on the second day.

Summer Vegan Bean Salad I
Serves 6-8 as a main course, with extras

INGREDIENTS
1 lb. / 454 g dried Rancho Gordo Royal Corona Beans, hydrated and cooked
24 oz. / 680 g (2 bottles, 12 oz./340 g each) marinated red peppers, drained
25-30 capers
3 large stalks celery, diced
1 red onion, diced and macerated (see note above)
1 bunch scallions (10-12), sliced
1 cup / 60 g chopped fresh parsley
1 tbsp / 2.4 g fresh thyme, finely minced
16 oz. / 454 g julienned sun-dried tomatoes in oil (using the oil)
.75 cup / 85 g slivered almonds

Next go, we may find room for some of those other ingredients on the dance card, plus cucumber, jicama, nopalito, or something else!

Incidentally, if you’re not wedded to the Vegan thing, bacon & bleu cheese, prosciutto & Parmesan, or even chicken & chevre could be welcome additions.

One final and sad note: As I was writing this, I learned that the Pulitzer Prize-winning food writer Jonathan Gold died. He was as much a part of this city’s cultural life as Jim Murray or Jack Smith; he was the culinary literary equivalent for this city of the likes of Mike Royko or Studs Terkel or Herb Caen. He is simply irreplaceable, and his passing at 57 is too soon by decades. I cannot begin to imagine how much our lives will be impoverished by his absence.

http://www.latimes.com/food/jonathan-gold/

The Return of Be a Star and Save the Bucks — Breakfast Egg Bites [No Instant Pot® Needed Version]

1

The so-called Balneo Mariæ, as seen in “The Newe Jewell of Health,” 1576. The one we’re going to use is a little simpler to operate.

In the wake of my recent post about trying to duplicate the Starbucks® sous vide egg bites in an Instant Pot®, a couple of things happened that occasioned this revisit. 1) The bride said I’d gotten the origin story all wrong (she recalls it as having happened this past summer when we were headed out of the Denver metro area on the way to South Dakota in a rented monster truck, and she’s right, as per usual); and 2) my pal Sharon asked via Facebook (and hence via the bride, as I’m still on my 60-day Facebook vacation) whether the recipe could be replicated without benefit of sous vide machine or Instant Pot®.

On the latter point, I had some experience with a technique that I was confident would point me in the right direction.

The low-tech version I’m about to describe has a lot in common with making oeufs en cocotte or, as they’re known in English-speaking countries, shirred eggs. In both of those recipes, though, the yolks are still quite liquid, which means they’re probably not the best option for food destined for on-highway consumption. Also, I wanted to mimic the approximate size of the Starbucks® bites, and all the cocottes (or ramekins) in our pantry are too large for a single-egg bite, unless you’re willing for it to be more puck-shaped than ovoid.

Now that I have you intrigued, frightened, or both, it’s time to introduce you to the delights of the hot water bath known as the bain-marie.

Ever wonder for whom the bain-marie was named? Take a guess: Marie Antoinette? Marie Curie? Marie Osmond? Wrong, wrong, wrong.

Maria the Jewess, chemist and process engineer.

Maria the Jewess (a/k/a Maria Prophetissima, Maria Hebræa, Miriam the Prophetess, and Maria of Alexandria, among others) is credited with creating the water bath process that bears her name. Although none of her manuscripts survive, she was cited by the Gnostic mystic Zosimos of Panopolis in the 4th century and the noted physician Arnaldus de Villa Nova in the 13th century for her accomplishments, which also are said to have included the invention of the alembic (an early still). And while Italian cookbook author Giuliano Bugialli is quoted as saying the device is actually named after a 16th century Florentine named Maria de’Cleofa, that seems to be a somewhat dubious claim, given the way earlier Villa Nova citation.

Yeah, great, but what does all this have to do with my eggs?

At sea level, the water in a bain-marie can’t exceed 212°F / 100°C, because it turns into steam. Duh. So the technique is often employed in the creation of cheesecakes, custards, and warm emulsions (such as Hollandaise sauce) that need to be cooked gently. One serious egg-cooking challenge is that the proteins in their whites and yolks coagulate (technically denature) at slightly different temperatures. Cook an egg too long (or hot), it gets rubbery like a Super Ball. Not long enough, and it comes out like a big yellow sneeze. The way these silicone pans are constructed, the bain-marie water can flow around almost all of the egg’s exterior, which makes them an efficient option (as opposed to ramekins or cocottes, whose thicker ceramic sides inhibit the transfer of heat).

Upside-down silicone egg tray.

My silicone tray holds seven servings of 75 ml / 5 tbsp. each, although you won’t want to fill each cup up to the tippy-top, since the egg mixture expands. [If you don’t have (or are not willing to purchase) a silicone egg tray, but you have ramekins/cocottes, by all means give this recipe from the FatLossFoodies blog a shot. I haven’t tried it personally, but it looks legit; read the comments on it as well for some interesting insights.]

All the ingredients in this recipe came directly from the fridge, although over the course of being mixed together and awaiting the water to come to a boil (maybe 10-15 minutes total), I’m sure they warmed considerably. When I put them in the oven, I draped the top of the tray loosely with aluminum foil to prevent the egg bites’ tops from being exposed directly to the oven’s hotter ambient air, which could toughen their texture.

Chillaxin’ in the bain-marie.

I also changed up the recipe a bit from the one in the other post.

INGREDIENTS
4 eggs
2 tbsp. / 30 g sour cream (or crema Mexicana, Salvadoreña, Hondureña, or Centroamericana)
½ cup / 100 g tomato artichoke bruschetta mix
1 cup / 125 g grated cheese (I used queso de bufala from Spain, but any melty cheese works)
2 tbsp. / 11 g fresh basil, chopped
pinch pepper
olive oil or canola oil spray to coat the molds
6 cups / 1½ liters boiling tap water for bain-marie
aluminum foil

DIRECTIONS
Set water on to boil. Preheat oven to 300°F / 150°C. [Alternatively, you can put your bain-marie tray and the water — even warm tap water — in the oven as it heats, and let it all come to temp together. It will save you a pot, if not any huge amount of time.] Oil egg bite tray and set aside. Chop basil, grate cheese, and set aside. In a medium size bowl, whisk the eggs, sour cream, and tomato artichoke bruschetta mix together until smooth. Fold in the basil and grated cheese. Spoon mixture evenly into oiled cups in the egg tray. Sprinkle pepper evenly over egg cups. Add the boiling water to the bain-marie, if you haven’t already done so. Lower the egg tray (or ramekins/cocottes) into the bain-marie. Cover the egg tray loosely with aluminum foil, and cook for 50 minutes. Remove bain-marie from oven, remove egg tray from bain-marie (the easy, non-finger-burning method is to slide a spatula under the tray and lift it while balancing it against the potholder in your other hand), and then allow egg bites to cool for 10 minutes before unmolding. Eat immediately, or refrigerate in sealed container for up to five days. Reheat for 30 seconds on “high” in microwave.

Silky and seductive.

Enter The Octagon. Salad, that is.

0

This is going to be a little frustrating for those of you who need precise measurements or who aren’t comfortable grilling a steak. I’m just warning you up front, so you won’t be disappointed and won’t waste your time. That said, if you are agreeable to a bit of improv, you’ll be rewarded with a tasty, carnivore-pleasing meal. It’s called the Octagon Salad, not in homage to the ridiculous 1980 film starring the ridiculous Chuck Norris, but because it has eight elements, to wit:

    INGREDIENTS
    Mixed Greens
    Grilled Steak, cut in strips [Chicken or Pork may be substituted if desired]
    Corn (fresh, canned, or frozen)
    Tomatoes (cherry or grape; chopped sun-dried tomatoes can be substituted)
    Marinated Bell Peppers (1 jar usually does it for me)
    Cashews (preferably roasted and salted)
    Tortilla Strips*
    Cilantro-Pepita Caesar Dressing
    Finishing salt

The beauty part of this salad is that, apart from the steak and the tortilla strips, it can all be assembled from pre-packaged ingredients; cherry or grape tomatoes work particularly well in that regard (you can slice them in half if you feel the need). It’s also a terrific way to use up leftover grilled meats, should you have some. While I’ve tried making this with store-bought rotisserie chicken, the texture just doesn’t work, so I advise against it. I haven’t yet tried it with grilled sausage, but I’m sceptical as to whether it would work… maybe an herbed chicken sausage could be acceptable. Or maybe not. [If you find one that fits, please let me know!]

As for the cilantro-pepita dressing, if you happen to live in California (as I do), it’s a pretty good bet that one of your local supermercados carries the El Torito brand, which is right tasty, if somewhat expensive. If you are feeling more adventurous, or are just plain thriftier, copycat recipes for a DIY version can be found here and here.

The steak, corn, tomatoes, and marinated bell peppers can be combined with the dressing ahead of time, and if you have more than one evening’s worth of those ingredients, they may be kept in an airtight container in the fridge for a few days. Don’t add the cashews or the tortilla strips until the very end, or they’ll lose their crunch (part of this salad’s attraction is its variety of textures). It is best served al fresco with a white wine (Sancerre, Albariño, and Moschofilero all work well) or a rosé (even sparkling!), but if you are watching calories, some lemon and cucumber spa water is an excellent substitute.

Be sure to sprinkle a tiny bit of coarse finishing salt over each individual plate immediately before serving. This is a place where a little Pink Himalayan salt or black “lava” salt (which is just salt mixed with charcoal, incidentally) can add some visual interest. I have a bunch of different salts from all over the world for just this purpose. Trust me, your guests will feel special when you tell them that you had your grey sea salt shipped in from the Guerande Salt Ponds on the Breton coast. Or they may just consider you a dimwitted gasbag easily fished in by the latest culinary fad. But either way, it will be entertaining for them, and that’s the point.

And yes, I realize that the finishing salt brings the ingredient total up to nine. But who would want to eat a nonagon salad?

*The way to get the tortilla strips done as in the photo is to purchase a package of taco-sized corn or flour tortillas (spinach- or tomato-enhanced tortillas add an extra colourful dimension), cut them into quarters, stack the quarter-rounds and slice off 1/4″ (6mm) strips. Heat up about 1/2″ (13mm) of canola or other high-smoke-point oil in a frying pan, and dump in the strips, stirring until browned. Remove strips from frying pan with slotted spatula and cool on paper towels. If you have extra, pop them in a Ziploc bag and save for later; they should be fine for at least a week, but they never seem to last that long.