The Return of Be a Star and Save the Bucks — Breakfast Egg Bites [No Instant Pot® Needed Version]

1

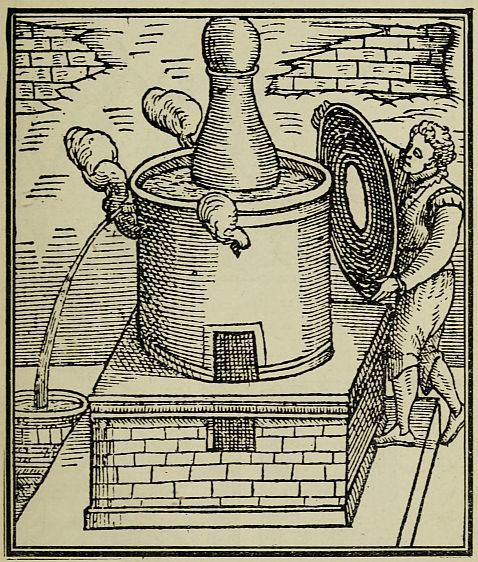
The so-called Balneo Mariæ, as seen in “The Newe Jewell of Health,” 1576. The one we’re going to use is a little simpler to operate.

In the wake of my recent post about trying to duplicate the Starbucks® sous vide egg bites in an Instant Pot®, a couple of things happened that occasioned this revisit. 1) The bride said I’d gotten the origin story all wrong (she recalls it as having happened this past summer when we were headed out of the Denver metro area on the way to South Dakota in a rented monster truck, and she’s right, as per usual); and 2) my pal Sharon asked via Facebook (and hence via the bride, as I’m still on my 60-day Facebook vacation) whether the recipe could be replicated without benefit of sous vide machine or Instant Pot®.

On the latter point, I had some experience with a technique that I was confident would point me in the right direction.

The low-tech version I’m about to describe has a lot in common with making oeufs en cocotte or, as they’re known in English-speaking countries, shirred eggs. In both of those recipes, though, the yolks are still quite liquid, which means they’re probably not the best option for food destined for on-highway consumption. Also, I wanted to mimic the approximate size of the Starbucks® bites, and all the cocottes (or ramekins) in our pantry are too large for a single-egg bite, unless you’re willing for it to be more puck-shaped than ovoid.

Now that I have you intrigued, frightened, or both, it’s time to introduce you to the delights of the hot water bath known as the bain-marie.

Ever wonder for whom the bain-marie was named? Take a guess: Marie Antoinette? Marie Curie? Marie Osmond? Wrong, wrong, wrong.

Maria the Jewess, chemist and process engineer.

Maria the Jewess (a/k/a Maria Prophetissima, Maria Hebræa, Miriam the Prophetess, and Maria of Alexandria, among others) is credited with creating the water bath process that bears her name. Although none of her manuscripts survive, she was cited by the Gnostic mystic Zosimos of Panopolis in the 4th century and the noted physician Arnaldus de Villa Nova in the 13th century for her accomplishments, which also are said to have included the invention of the alembic (an early still). And while Italian cookbook author Giuliano Bugialli is quoted as saying the device is actually named after a 16th century Florentine named Maria de’Cleofa, that seems to be a somewhat dubious claim, given the way earlier Villa Nova citation.

Yeah, great, but what does all this have to do with my eggs?

At sea level, the water in a bain-marie can’t exceed 212°F / 100°C, because it turns into steam. Duh. So the technique is often employed in the creation of cheesecakes, custards, and warm emulsions (such as Hollandaise sauce) that need to be cooked gently. One serious egg-cooking challenge is that the proteins in their whites and yolks coagulate (technically denature) at slightly different temperatures. Cook an egg too long (or hot), it gets rubbery like a Super Ball. Not long enough, and it comes out like a big yellow sneeze. The way these silicone pans are constructed, the bain-marie water can flow around almost all of the egg’s exterior, which makes them an efficient option (as opposed to ramekins or cocottes, whose thicker ceramic sides inhibit the transfer of heat).

Upside-down silicone egg tray.

My silicone tray holds seven servings of 75 ml / 5 tbsp. each, although you won’t want to fill each cup up to the tippy-top, since the egg mixture expands. [If you don’t have (or are not willing to purchase) a silicone egg tray, but you have ramekins/cocottes, by all means give this recipe from the FatLossFoodies blog a shot. I haven’t tried it personally, but it looks legit; read the comments on it as well for some interesting insights.]

All the ingredients in this recipe came directly from the fridge, although over the course of being mixed together and awaiting the water to come to a boil (maybe 10-15 minutes total), I’m sure they warmed considerably. When I put them in the oven, I draped the top of the tray loosely with aluminum foil to prevent the egg bites’ tops from being exposed directly to the oven’s hotter ambient air, which could toughen their texture.

Chillaxin’ in the bain-marie.

I also changed up the recipe a bit from the one in the other post.

INGREDIENTS
4 eggs
2 tbsp. / 30 g sour cream (or crema Mexicana, Salvadoreña, Hondureña, or Centroamericana)
½ cup / 100 g tomato artichoke bruschetta mix
1 cup / 125 g grated cheese (I used queso de bufala from Spain, but any melty cheese works)
2 tbsp. / 11 g fresh basil, chopped
pinch pepper
olive oil or canola oil spray to coat the molds
6 cups / 1½ liters boiling tap water for bain-marie
aluminum foil

DIRECTIONS
Set water on to boil. Preheat oven to 300°F / 150°C. [Alternatively, you can put your bain-marie tray and the water — even warm tap water — in the oven as it heats, and let it all come to temp together. It will save you a pot, if not any huge amount of time.] Oil egg bite tray and set aside. Chop basil, grate cheese, and set aside. In a medium size bowl, whisk the eggs, sour cream, and tomato artichoke bruschetta mix together until smooth. Fold in the basil and grated cheese. Spoon mixture evenly into oiled cups in the egg tray. Sprinkle pepper evenly over egg cups. Add the boiling water to the bain-marie, if you haven’t already done so. Lower the egg tray (or ramekins/cocottes) into the bain-marie. Cover the egg tray loosely with aluminum foil, and cook for 50 minutes. Remove bain-marie from oven, remove egg tray from bain-marie (the easy, non-finger-burning method is to slide a spatula under the tray and lift it while balancing it against the potholder in your other hand), and then allow egg bites to cool for 10 minutes before unmolding. Eat immediately, or refrigerate in sealed container for up to five days. Reheat for 30 seconds on “high” in microwave.

Silky and seductive.

Be a Star and Save the Bucks — Breakfast Egg Bites [Instant Pot® recipe]

2

Mmmmm. Eggy.

Even if you don’t follow my formula, you simply have to make these. They are so simple, so satisfying, so tasty, and so (at least potentially) wholesome that they tick off every box I could hope for in a recipe.

Here’s the backstory: A little over a year ago, the bride and I were driving from Northern California to our Los Angeles-area home. It’s about a five hour ride, punctuated by the standard gas and potty breaks, and we often fit in a snack somewhere during a pit stop. Independently, we concluded that fast food, while convenient, was just plain sad, and probably not all that good for us. So we left it behind and began to pack our own road chow. On one trip, though, our planning (read MY planning) was severely deficient, and we were left to the mercy of Interstate 5’s culinary jungle. To make matters more challenging, the bride was on a gluten-free kick, which diminished our already circumscribed choices by about 87.3%. As luck would have it, Starbucks (a popular American coffee-and-snack chain, for all you international readers) offered sous vide eggs with cheese and some sort of meat (Gruyere and bacon, as I recall, though there are several variants available now) on their menu. They were — are — delicious. And while I’m not gonna hate on Starbucks for their pricing strategy, let’s just say they were a tad more expensive than a McGutbomb.

Let them eat eggs: $4.45 USD. Less than Beluga, more than filet mignon.

But I digress. I came to praise Starbucks, not to bury it.

Even without a sous vide machine, you can make a very acceptable substitute in your Instant Pot®, and it’s so easy, it’s actually more work to write this down — and probably more even to read it — than to make the recipe.

One thing you’ll likely want is a silicone tray variously described as an egg bites mold or a baby food storage tray or some such. I purchased this pair of molds at Amazon, both because I wasn’t sure what would fit my cooker and because I wasn’t sure how big the finished eggs should be. In retrospect, given that I have an 8-qt. Instant Pot®, I probably should have gotten a pair of the larger trays. Live and learn. There’s nothing wrong in theory with mini-bites, even if I haven’t made them yet. While some folks recommend making these in tiny Mason jars, I think it’s a huge pain in the patootie, cleanup-wise. Egg just loves to weld itself to glass.

Here’s a down-and-dirty roadmap for the eggs I generally prepare for the bride to take to work. It’s super easy, endlessly modifiable, and produces a taste treat which, while not vegan, slides under the ovo-lacto vegetarian bar with ease. If that’s not a dealbreaker for you, the sky’s the limit. Anything you could put in an omelet you can put in these, from oysters to tortilla strips, so let your fancy run amok a bit. Pulled pork with BBQ sauce? Hot dog bites with Dijon mustard? Water chestnuts, scallions, and ginger? Why not? It probably goes without saying (except that I’m saying it now) that if you are concerned about cholesterol, you can modify this “recipe” by substituting egg whites for whole eggs.


Starbucks-style Egg Bites

Makes 7 egg-ish size servings

Cheese and cilantro and tomatoes, oh my.

INGREDIENTS
4 eggs
2 tbsp. / 30 g sour cream (or crema Mexicana, Salvadoreña, Hondureña, or Centroamericana)
1 cup / 125 g grated cheese (I used Monterey Jack) (and remember, this is not a packed cup)
3/4 cup / 40 g sun-dried tomatoes, chopped
3/4 cup / 25 g fresh cilantro, chopped
1 teaspoon / 2 g pimentón de la Vera
pinch salt
olive oil or canola oil spray to coat the molds
2 cups / 500 ml tap water for the Instant Pot®
aluminum foil

Covered egg tray ready for the steam bath.

DIRECTIONS
Oil egg bite tray and set aside. Chop tomatoes and cilantro, grate cheese, and set aside. In a medium size bowl, whisk the eggs, sour cream, pimentón de la Vera, and salt together until smooth. Fold in the cilantro, tomatoes, and cheese. Spoon mixture evenly into oiled cups in the egg tray. Add the water to the Instant Pot® container. Cover the egg tray loosely with aluminum foil, place it on the Instant Pot® steaming trivet, and lower it into the Instant Pot®. Set to “Steam” for 8 minutes at high pressure, making sure that the vent is set to “Sealing” rather than “Venting.”

Looks like this? You did it right.

When the timer beeps, you can either let the pressure release naturally or carefully move the vent from “Sealing” to “Venting,” making sure to keep your hands clear of the steam. Allow the bites to cool for a few minutes before eating, or put them in the fridge for future use.

Reheat one or two at a time in the microwave for 30 seconds on high and serve.

Incidentally, if you want to make multiple trays at a time, just stack them slightly offset to one another and go for it. I’m guessing you could fit a three-tray stack in the 8-qt. Instant Pot®, which would use up a dozen eggs. Because the bride and I are a duprass, we don’t really have much use for 21 egg bites at one go. Your mileage may vary.

Pro tip: My chef pal Stefhan Gordon turned me on to Vital Farms eggs, which are ethically raised. Of all the horror stories that my anti-omnivore friends trot out, few can compare with the way most commercial/industrial chickens are treated. To make matters worse, egg producers employ a dazzling variety of unregulated terms designed to fool consumers into thinking chickens are being treated better than they actually are. In Southern California, Vital Farms eggs are widely available at supermarkets, and they conform to the highest standards. Yeah, they are maybe a couple bucks more per dozen. But I’m willing — no, make that happy — to spend a quarter per egg to inject a little humanity into my breakfast. Do yourself and your avian friends a good deed, and have a care about sourcing your eggs.

Pear and Bourbon Croustade

0

That plate will mean something to readers of a certain age…

Working with phyllo dough is like working with horses, musicians, or people of whichever gender(s) you find sexually attractive; it’s kind of a pain in the ass, but if you are patient and let them (mostly) have their way, you can achieve magnificent results.

Full disclosure: This recipe is derived from “Apple and Calvados Croustade” by Leslie Brenner, originally published in the Los Angeles Times on 12 December 2007. Fuller disclosure: it, in turn, was inspired by a recipe for Apple and Armagnac Croustade in the Cafe Boulud Cookbook by Daniel Boulud and Dorie Greenspan. “Okay, enough with the disclosures already” even fuller disclosure: I have interviewed Boulud and Greenspan on multiple occasions, and their recipes and aesthetic are beyond reproach. So why didn’t I just make their croustade? I’m glad I asked me that. Basically, I wasn’t feeling like apples the night I decided to make it, and pears were in season (and cheaper). It seems that the basic croustade shell could be a happy edifice for all sorts of fruit compotes (peaches, mangoes, and papayas would all likely perform well, so long as they weren’t overripe). I might even have a go at carambolastar fruit — some day, so feel free to play.

Feelin’ hot hot hot.

A note on alcohol, fire safety, and children. When I was a kid, helping out one or another of my grandmothers in the kitchen, I would have just adored being part of a flambé. Well, perhaps not the flambé itself, but part of the process. You are the best judge as to whether your children should be permitted in the kitchen — or the county — when you do this. So long as they stand back at least three feet, everything should be hunky dory, and perhaps even better if you say “Don’t tell [other parent or siblings] I let you help me, okay?” That’s the kind of secret kids love to keep, although they may not be successful in so doing. When it comes to fire safety, I had a sheet pan sitting out that I could employ to cover the flambé pan post-haste, breaking the “oxygen” side of the “oxygen-heat-fuel” fire triangle. Lastly, if alcohol is an issue for you, feel free to leave it out. After all, we’re basically putting a fruit compote into a phyllo dough crust, and there are no fewer than 17,583 ways to do that.

Save some for the baker.

Making your own phyllo dough: Don’t. Life is too short.

The apple version of this croustade seems to have originated in the southwest of France (the name derives from the Occitan crostada, literally “crusted”), and this style of dessert is mainly found in Midi-Pyrénées, now part of Occitanie. It may be known also by pastis (which it is called in the Quercy and the Perigord) or tourtière (in the Tarn and the Landes). In the Gers, the croustade is called Pastis Gascon (not to be confused with the aperitif!).

A bowl of Bartletts.

GEAR

Small fine mesh strainer or sifter for applying powdered sugar
Pastry brush
Silicone mat or parchment paper
Baking sheet
9″ / 225mm tart ring (size may vary some; see below)
Canola oil spray for lubricating tart ring and parchment paper (optional)
Thin, lint-free towel (approx. 18″ x 24″ / 455mm x 600mm)

Mise en place after pears are cooked.

INGREDIENTS

1 stick plus 2 tablespoons (113g + 30g) butter, divided
6-8 Bartlett (or other, except Asian) pears, peeled, cored, and cut into 1/3″ / 8.5mm slices
1 moist, plump vanilla bean
1/4 cup / 50g light brown sugar (you can substitute white sugar; i preferred the brown for an extra “bass note”)
1/3 cup / 75ml vanilla-infused bourbon or pear brandy or pear eau de vie or rum (should be 70 proof / 35% alcohol or higher)
1/2 package of frozen phyllo dough (.5 lb. / 225g, containing about 20 sheets or so), thawed
[NOTE: The phyllo take 2 hours to thaw at room temp or overnight in the fridge]
1/2 cup / 60g powdered sugar (or more, as needed)
1/3 cup / 35g sliced almonds, divided

DIRECTIONS

Peel and cut pears into 1/3″ / 8.5mm slices. Set in bowl and set aside. [Normally, I would have the bowl filled with acidulated water to prevent the pears from going brown, but since you’re going to caramelize them, that’s not an issue.] Cut the vanilla bean lengthwise in half and, using the tip of a small knife, scrape the seeds over the pears and drop the pod on top. Add the 1/4 cup / 50g brown sugar to the pears in the bowl and stir gently.

Melt 4 tablespoons / 55g / one-half stick of butter in a large skillet over medium heat. When the butter is foamy, add the pears with the vanilla and the sugar and cook, stirring occasionally and gently, until the pears are lightly caramelized and soft, about 20 to 25 minutes. Add your alcohol of choice and, standing well back while using a long match or grill-style lighter, set it aflame. When the flames subside, turn the pears over in the sauce; when the the alcohol has reduced to a glaze, transfer the pears to a bowl and allow them to cool to room temperature. Remove vanilla bean. [If you started late at night and want to finish up the next morning, as I did, or need to take a break, you can do so here. Just cover the lot with cling film, pop it all in the fridge, and come back when you’re ready to pick up again.]

Center a rack in the oven and heat it to 350°F / 175°C. Grease a 9″ / 225mm tart ring (I used the side of a springform pan) and place it on a baking sheet lined with a silicone mat or parchment. Melt the remaining butter and set it aside. Unfold the phyllo dough on your work surface and cover it with a damp towel.

Working quickly, remove the top sheet of phyllo (re-covering the remaining sheets), brush it lightly with butter, and dust it with powdered sugar. Gently and loosely crumple the dough into a circle and lay it into the pastry ring. Sprinkle it with a few of the almonds. Repeat this procedure five more times, until you have six buttered, sugared, and almond-sprinkled sheets of phyllo layered in the ring. Do not press them together — let them keep some height.

Spoon the pears into the center of the croustade, leaving a 1-inch / 25mm border bare. Working as you did before, butter, sugar, and crumple two sheets of phyllo, fitting them loosely over the pears. Sprinkle this layer with the remaining almonds, and cover this with another pair of crumpled, buttered, and sugared sheets of phyllo. Drape the phyllo artfully, so it looks good. Don’t feel bad if a phyllo sheet tears; just pick up the remaining part and arrange it adjacent to its sibling. And if it goes completely sideways, as, say, cling film sometimes will, you can make a command decision to ditch the dough or just tuck its shards someplace toward the middle for “texture.”

Slide the croustade into the oven and bake for about 10 to 12 minutes, watching the top of the tart carefully to make certain it doesn’t brown too much (depending on your oven, you may want to rotate it at the halfway mark). When the top is just lightly browned, remove the croustade from the oven.

Increase the oven temperature to 400°F / 200°C. Butter and sugar another pair of phyllo sheets, loosely crumple them and place them side by side on the previous layer to make a light, airy crown. Bake for 5 to 10 minutes, or until lightly browned, then remove it from the oven again.

Butter the last sheets of phyllo and, once again, crumple them to make a crown. Place them on top of the croustade and dust it heavily with some of the remaining powdered sugar. Return it to the oven and bake until the top layer caramelizes evenly, about 5 to 10 minutes. Check the progress of the sugar frequently, because — like toast — it can go from brown to burned in a flash. Pull the croustade from the oven as soon as the top is a golden caramel color and allow it to cool for 5 to 10 minutes. Dust it one last time with a little powdered sugar.

To serve, lift off the tart ring and, using two wide spatulas, transfer the croustade to a serving plate. Serve warm or at room temperature the day it is made, with crème fraîche, very lightly sweetened whipped cream, or vanilla ice cream.

[CODA: I used a silicone basting brush for the butter, and while it was okay, it wasn’t brilliant. A paintbrush-style brush would have worked better. It is apparently customary in France to cut these with a pair of long, sharp scissors. However you decide to do it, the croustade is going to shed some of its golden phyllo. If you’re cutting it up in the kitchen, you can gather the crumbs and arrange them as artfully as possible, or just hide them under the whipped cream. Finally, this is plenty sweet without any help, so feel free to serve it plain.]